Step-by-Step Guide to Hyundai I30 Window Regulator Repair
If you own a Hyundai I30, you may have encountered an issue with your window regulator. This crucial component controls the movement of your car’s windows and ensures they open and close smoothly. However, with wear and tear, the window regulator can malfunction, leaving you with a stuck or malfunctioning window. Instead of spending a lot of money on a professional repair, why try fixing it yourself with our step-by-step Hyundai I30 Window Regulator repair guide? This blog post will take you through repairing your window regulator, saving you time and money.
Understanding the Importance of a Window Regulator
Picture this: you’re cruising down the highway and suddenly want to let some fresh air in. You reach for the window control, but nothing happens. The window doesn’t budge. Annoying, right? That’s where your window regulator comes into play. This underappreciated component is the unsung hero that controls your car’s window movement. The assembly is a team effort, with each part contributing to your windows’ smooth, upward and downward glide.
But when one of the members starts lagging, it can disrupt the entire operation, resulting in a stuck window or one that operates with a mind of its own. It’s more than just an inconvenience; it can pose a security risk if your window refuses to close. So, understanding the significance of your Hyundai I30’s window regulator and ensuring it functions properly is vital to your overall driving experience.
Identifying Common Window Regulator Problems
Your window regulator can throw various curveballs, leaving you wondering what went wrong. A common sign of a faulty regulator is a window that has developed a mind of its own. It may groan and protest as it grudgingly creeps upwards, leaving you to push it the rest of the way manually. Or worse, it might refuse to budge, leaving you without the desired cool breeze.
Then there’s the window that starts behaving like a rebellious teenager, making unusual clunking or grinding noises as it moves. Recognizing these signs as they first appear is crucial. It’s the automotive equivalent of catching a small fire before it engulfs your entire house. Early detection means fewer headaches and saves your wallet from a hefty repair bill. So, watch for those telltale noises and signs of misbehaving windows.
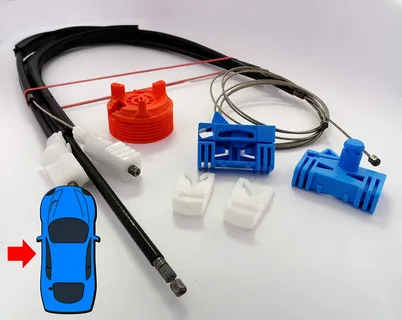
Importance of a Window Regulator Repair Kit
Have you got your Hyundai-I30 Window Regulator acting up? Breathe easy. A window regulator repairing kit is your knight in shining armour, designed to simplify your repair process. Consider it a well-thought-out toolbox tailored to your exact window regulator repair needs. The best part? This all-inclusive kit saves you the hassle of hunting down each part, a game of hide and seek that could consume your precious time and patience.
And let’s remember the cost factor. Buying a kit is often more economical than purchasing the parts separately. Plus, you can sigh in relief knowing you have all the bits and bobs required to bring your window back to life. So, whether it’s a rebellious window refusing to budge or an annoying grinding noise messing with your peaceful drive, a window regulator repair kit comes equipped to handle it all. Grab one, and you’ll go to smooth, obedient windows.
Unpacking Your Window Regulator Repairing Kit
Now that you’re fully versed in your window regulator’s role and importance let’s delve into the repair kit. This essential pack, tailored specifically to your Hyundai-I30 Window Regulator needs, is like a treasure chest waiting to be opened. As you unbox it, you’ll find all the necessary components, including a brand-new window regulator, an assortment of screws, vital clips, and other integral parts, all ready to breathe new life into your stubborn window.
However, take your time with the repair process. Take some time to familiarize yourself with each component. Get a feel for what’s what, and ensure every piece is in top-notch condition. After all, understanding what you’re working with is half the battle won. So, go ahead, explore your kit, and get ready to wage a successful war against that misbehaving window!
Preparing for the Repair
Your safety is paramount before you gear up to repair the window regulator. So, begin by disconnecting the vehicle’s battery to ensure you avoid any electrical surprises. Then, gather all the tools you’ll need for the task ahead. These include a screwdriver for those stubborn screws and a trim removal tool to pry off the door panel smoothly.
Remember the gloves to protect your hands. As they say, it’s always better to be safe than sorry! Once you have all the tools, please take a deep breath, and let’s get started. It’s time to say goodbye to your window woes.
Removing the Door Panel
Let’s roll up our sleeves and start the real action. Your first task? Removing the door panel. This process might seem intimidating, but with your trim removal tool in hand, you’re more than prepared. Approach the panel with the confidence of a seasoned pro, gently wedging your tool between the door and the panel. Be careful; you don’t want to scratch that beautiful door finish.
As you pry, you’ll feel the panel begin to loosen. That’s your cue to proceed, gradually working around the panel. Do you feel that the last clip popped free? You’re almost there. However, take your time. Remember those wires connected to the panel? Make sure you carefully disconnect them before fully removing the panel. There you have it; you’ve successfully removed the door panel. It’s time to move forward to the next step.
Identifying the Faulty Parts
With the door panel out of the way, you can see the window regulator’s inner workings clearly. It’s time to wear your detective hat and find the culprits causing your window grief. Keep your eyes peeled for the usual suspects – worn-out cables, broken plastic clips, or any other visible signs of damage. These indicators hint at which parts have been thrown in the towel and need replacement.
Remember, the devil is in the details. Carefully observing and identifying these faulty components is the first step to restoring your window to its original, smoothly-operating self. So, get up close and personal with your window regulator, locate those troublemakers, and you’ll be ready for the next step: replacing them with new, top-notch parts from your repair kit. It’s time to put your window’s bad days behind you. Happy hunting!
Installing New Parts
With the defective parts pinpointed, it’s time to step into action. This phase is about bidding farewell to those old, worn-out parts and welcoming the new, shiny components from your repair kit. Just remember, there’s no rush here. Take a moment to study the instructions that come along with your kit.
They’re your roadmap to a successful repair and can vary based on the specific model of your Hyundai I30. The new parts will fit like puzzle pieces, filling in the places left vacant by the parts you’ve just removed.
So, with the toolkit in one hand and your new parts in the other, you’re all set to embark on this crucial repair step. Be meticulous, be patient, and remember – the reward at the end is a window that’s back to operating smoothly, just like it’s supposed to. Let’s replace those new parts and bring that window back to life!
Reassembling the Door Panel
The finish line is in sight! With the new window regulator components in place, it’s time to button things back up. But hold on to your horses! Before you start, remember those wirings you disconnected earlier? It’s time to reunite them with their respective connections. Please ensure they’re secure and ready to power your brand-new window regulator. Then, grab the door panel and align it with the door.
Gently but firmly, press it back into its original position. You should hear the satisfying click of the clips locking into place. Don’t forget those screws from your repair kit. Fasten them in the designated spots to secure the panel firmly onto the door. Just remember, it’s not a race; precision is key.
One step at a time, and before you know it, you’ll have successfully reassembled your door panel. You’re almost there; the moment of truth is near. Just a quick window test separates you from victory. Now, let’s move on to the final step of your Hyundai-I30 Window Regulator repair journey.
Testing Your Repair
It’s show time! You’ve completed the challenging repair task; now it’s time to give your handiwork a whirl. Reconnect your vehicle’s battery, ensuring it’s securely in place. Head to the driver’s seat and power up your Hyundai I30. You can almost feel the anticipation humming in the air. Push that window button and keep your fingers crossed.
Watch as your window descends, then rises smoothly, obediently responding to your commands. Listen. Do you hear that? That’s the sweet sound of silence – no groaning, no protesting, just the quiet whir of a perfectly functioning window.
Congratulations! You’ve triumphed over a tricky task and restored your window regulator to perfect health. Revel in the satisfaction of a job well done, and the next time your window decides to act up, you know you’ve got the skills to tackle it head-on. Now, hit the road and enjoy the fresh breeze through your flawlessly operating window. You’ve earned it!
FAQ’s
1. Q: How can I tell if my window regulator is faulty?
A: Signs of a faulty regulator can include windows moving slowly, making a grinding noise, or not moving. Also, a window that won’t stay up or drops suddenly strongly indicates a malfunctioning regulator.
2. Q: Do I need a Window Regulator Repair Kit to fix my Hyundai-I30 Window Regulator?
A: While not compulsory, a Window Regulator Repair Kit simplifies the process, providing all the components in one package. It saves you time hunting for individual parts and is typically more economical.
3. Q: Can a novice perform the repair?
A: Yes, our guide is designed to be user-friendly, guiding you through each step of the process.
Remember, patience and careful attention to detail are essential.
4. Q: What precautions should I take during the repair?
A: Disconnect the battery before you start, gather all necessary tools, and wear protective gloves. Be gentle when removing the door panel and careful not to damage the wiring.
5. Q: What if the repair doesn’t work?
A: If your window still malfunctions after repair, it may be time to consult a professional mechanic. It could indicate a more complex issue beyond the regulator.
Conclusion
In conclusion, it is crucial to understand your Hyundai I30 Window Regulator and its importance. You can confidently handle common window issues with a repair kit and our detailed guide. Remember, being proactive, identifying early signs of malfunction, and understanding the repair process can save you significant time and money. So, the next time your window shows signs of rebellion, don’t fret – take a deep breath, pull out your repair kit, and embrace the challenge. Here’s to many more peaceful drives with smoothly operating windows!